Pages

Monday, June 30, 2014

Vanity Rehab

Once upon a time, I found this vanity by the side of the road.  There are multiple things I love about our neighborhood, but people's willingness to put furniture out by the side of the road is high up on my list.  If the furniture doesn't have any damage, I don't care how ugly it is, I want it to be mine.  Free=fabulous in my mind.  So I found this weird green vanity.  It wasn't too cute, but it had some great bones, so I took it home with me.  
 It also came with this mirror & the pieces to attach it to the vanity, which totally shocked me.  
So I started taking apart this sucker so I could paint it.  
 I wish I had taken more pictures of the process of me painting this thing, but I actually found it the night before I was having a yard sale, so I was in a crunch to get it finished so I could try & sell it.  I covered it first with some Kilz general purpose primer.  I love this stuff.  It is so legit.   After I covered that, I just took some leftover paint that I had used to paint the guestroom walls when I updated that room (see here for pics of that remodel) & painted the vanity.

After painting the vanity, I used one of my most favorite products to glaze it.

I don't know how well you can actually read the labels since I use the crap out of this stuff, bu tit is Valspar Antiquing Glaze in the color/shade of Asphaltum.  I LOVE it.  I have used it on my dining room table & countless DIY projects.  I am hoping to be able to start the nursery posts tomorrow & you will see how much I used this stuff.  The best thing is, a little goes a long way.  I have used one 8 fl oz container on this vanity, several nightstands, a dining room table, a huge dresser/changing table, a tall dresser, a shelf & a few other smaller projects.  It lasts FOREVER & I am pretty liberal with it.

You can find all kinds of tutorials of how to use this antiquing glaze on Pinterest.  I will tell you the method that works the best for me is to cut up pieces of an old T-shirt & use that to apply the glaze to the furniture.  I have tried the paintbrush effect before & I just don't love it.  I love to use a T-shirt because you can really feel the grooves in the furniture & you can figure out the right amount of pressure to get just the right amount of glaze kept on the furniture vs. being wiped back off.  I just put a dab of the glaze on the t-shirt & start glazing along with the grain of the furniture.  If you look at it & the glaze looks too dark, just rub the shirt on there a little more to blend it a little better or lighten it up.  
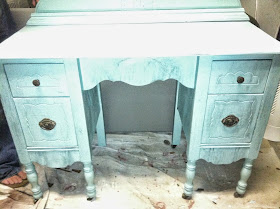
 So here is the vanity after it had been distressed.  This was probably one of my more liberal glazing projects, but I really liked it with the blue.  I also spray painted the handles with another of my favorite products...the Rustoleum Universal Hammered Spray Paint in brown.  I bought a can of that stuff & went nuts spray painting lamps, frames, handles, you name it & I spray painted it.  I get a little obsessive, can you tell?  ; )  
 Anyway, here is the dresser.  I desperately wish I would have found it sooner so I could have actually set it up in decent lighting to take pictures of it, but the yard sale was the next day & much to my delight, it sold for $75.  $75!  For a vanity I got for free off the side of the road & painted with stuff that I already had.  I was quite proud of myself & it gave me a little bit of a furlough of having to hear the hubby complain that my "side of the road furniture finds" were taking up space in his man-garage.  : )  

Friday, June 20, 2014

Salted Beer Caramel Corn

I know I have been horrible about posting, but we are about 3 weeks away from Operation Baby #2, so finishing the nursery has pretty much become our main goal at this point.  I am determined to finally finish up the posts on my grandfather's Vintage Beer Themed Party though so then I can hopefully move on to posting about the nursery.  : )  

So you all know that I wanted to keep the dessert table beer themed & where else did I look for ideas, but Pinterest.  I came across the idea of Salted Beer Caramel Corn on the blog The Beeroness.  It really turned out to be a hit because it balanced out the sweet & the salty.  

Here is a list of Ingredients (I changed their 1/3 cup corn kernels to 2 bags of microwavable popcorn mostly because we have some Boy Scouts in our neighborhood who sell a shit-ton of popcorn & we ALWAYS have way too many in our pantry).
1/3 cup corn kernels (I used 2 bags of microwavable popcorn instead)
2/3 cup brown sugar
2 tbs light corn syrup
½ cup imperial stout (I used Guinness), plus 2 tbs, divided
4 tbs butter
1 tsp coarse sea salt

So after gathering all of your ingredients, you can start making your caramel corn.  You start by preheating the oven to 250.  Now the directions on the The Beeroness blog give you great instructions for making your own popcorn.  I used 2 bags of microwavable popcorn & just followed the instructions on the bags.  I wasn't sure that 1 bag was enough to create the 7 cups needed of popcorn, but 2 bags was definitely enough &  I may or may not have eaten any extra... ; ) 

So take your 7 cups of popcorn & place them on a large baking pan that has been sprayed with cooking spray, making sure that they are all evened out & not overlapping each other.  Stick that in your preheated oven while you make your caramel sauce. 

To make the caramel sauce, add the brown sugar, light corn syrup, ½ cup stout and butter to a saucepan over high heat. Stir just until the sugar dissolves. Allow to boil for 7 minutes, without stirring. Remove from heat & immediately stir in the last 2 tablespoons of stout.

Take your popcorn back out of the oven & then take a silicon spatula that you have also sprayed with cooking spray & gently pour the caramel sauce over the corn, stirring to coat.  Toss it back in the oven to bake for 20 mins.  After 20 minutes, take it out & stir, and then bake for an additional 20 minutes.

Once you are done with the baking, take it out & spread the caramel corn mixture evenly onto parchment of wax paper & sprinkle with the sea salt.  I let mine sit for about an hour to make sure it was tight & then stored it in a tubberware contained until it was time to sit it out at the party.  It was really a good addition to the dessert table & something for the people to snack on who weren't that interested in sweets (although I'm not sure I trust those people, haha).  

Wednesday, June 11, 2014

Guinness Cupcakes

So back to my grandfather's 90th birthday party (you remember, the one with the horrible pictures, haha) & it's Vintage Beer Dessert Table...One of the things I made was Guinness cupcakes.  Of course Pinterest was involved & I found a great recipe on the Le Petit Pierogi blog.  
You know from my other desserts that I am not big on making things from scratch (one day, I swear), so this was a big step for me. ; )  I gathered the following: 1 cup Guinness (definitely snagged from the hubby's beer fridge), 1 cup unsalted butter, 3/4 cup unsweetened cocoa powder, 2 cups all purpose flour, 2 cups sugar, 1 1/2 teaspoons baking soda, 3/4 teaspoon salt, 2 large eggs, and 2/3 cup sour cream.  

Then you just preheat your oven to 350°F.  While your oven is preheating, in a saucepan over medium heat, melt butter and add Guinness, bringing it to a simmer. Whisk in cocoa powder until mixture is smooth. Set aside to cool slightly while you mix the other stuff together.  

In a large bowl stir together flour, sugar, baking soda, and 3/4 teaspoon salt.  Now the blog recipe I followed suggested using the bowl of a stand mixer fitted with the paddle attachment, but since I am not a real baker, I don't have such a thing.  So I used the biggest bowl I had & a hand mixer & I beat eggs and sour cream until thoroughly combined.  It seemed to work out fine although I am thinking I would like one of those fancy stand mixers one day.  On low speed, you drizzle in the Guinness-chocolate mixture and beat just to combine it.  Then you add in your flour mixture, a little at a time, and mix briefly on slow speed just until the mixture comes together.  (I am glad that the recipe calls for "low" & "slow" speeds because I am pretty sure my poor hand mixer can only handle a couple of different options).  Using a rubber spatula (I was impressed that I actually had one of these), you fold the batter until completely combined. 

Line 24 cupcake cups with liners.  Divide batter among cupcake liners, filling them 2/3 to 3/4 of the way. Bake cake until toothpick inserted into center comes out clean.  It took about 15 minutes in my oven.  Most ovens seem to vary.  Only you probably know how truthful your oven is.  After the cupcakes had cooled, I went to icing.  Now the Le Petit Pierogi blog has a great recipe for Bailey's Irish Buttercream frosting that I wish I had set aside time to make.  I think they even have a link to some ganache for the cupcakes.  Both of those sound amazing, but I was running out of time & energy, so store-bought chocolate chunk fudge icing it was.  It was delicious, so there you go.  Next time I am feeling fancy though, I definitely want to try to make that icing. 
These cupcakes were really tasty & not too beer tasting at all.  They would be great for Father's day or a birthday or something.  Definitely good for something different to try than the usual cupcake suspects. 


Friday, June 6, 2014

Angel Food Cake with Beer Macerated Strawberries

For my grandfather's 90th birthday, I did a Vintage Beer Themed Dessert table.  One of the desserts I made was an Angel Food Cake with Beer Macerated Strawberries.  
 Of course I took to Pinterest for some ideas.  I found this recipe for Grilled Angel Food Cake with Beer Macerated Strawberries from The Beeroness & used it as my inspiration since I wasn't going to have access to a grill.  
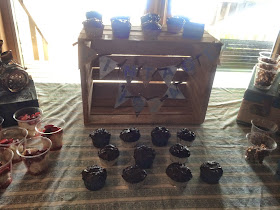
 I used a box mix to make this Angel Food Cake because I have never made angel food cake & had no clue where to start.  It turned out just fine, especially since I was just cutting it up anyway.  The morning of the party, I cut up a quart of strawberries.  I put half in one bowl & half in another.  In one bowl, I just added 1/3 a cup of sugar (this is for those that might not want beer in every dessert, I know, what are they thinking?).  In the other bowl, I added the same 1/3 cup of sugar, but I also added in 1/4 a cup of beer.  The recipe linked above says to use Belgian or pale ale.  As pregnant as I am & toting a toddler, I was not about to buy beer in the grocery store, so I used the most reasonable beer I could find in the hubby's man garage fridge.  I wound up using a blueberry beer.  It worked out fine.  Everyone who tried it came back for more, so I guess that is a good sign.  I just had the regular macerated strawberries & they were delicious too.  I topped them both with a little whipped cream & it was quite the tasty treat.  Now here are some really bright, not very clear pictures for you.  : )