Pages

Thursday, November 12, 2015

Peyton's 1st "Sailabration" Food Decorations

 Decorating the food for this party was super easy.  The most time consuming part was definitely these little boats to serve the goldfish in.  
I started with pink & navy scrapbook paper.  I then used the following instructions found on Pinterest at Big Dot of Happiness.
How To Make A Paper Boat & Anchor Nautical Party Ideas // Free Printable Nautical Paper // BigDotOfHappiness.com #paperboats #nauticalparty #anchors:
I then made all these pink & navy boats & alternated the colors on the table, using them to serve goldfish.
For the sandwiches, I used tiny wooden skewers.  I cut the same scrapbook paper to make right triangles.  I then punched holes in the top & bottom & put the skewer through the paper, making a sail.  

 I used the same method for the cupcakes.  Instead of using wooden skewers for them, I used cute little nautical, navy & pink straws that I found at Marshall's & Hobby Lobby.  The nautical ones went on clearance right after the 4th of July, which worked out great.
 In addition to the sails, I also alternated navy & pink cupcake holders.  I used pink cupcake holders & navy sails & vice versa.
I also used the same method to put sails in the "boats" of spinach dip & buffalo chicken dip.
I also put a sail on top of the boat cake.   
So with some sheets of scrapbook paper, wooden skewers & paper straws, I had the entire party food decorations done.  Super easy & I think it turned out pretty cute.  Happy "sailabrations" y'all!


Main Party Page: http://manicmamamiles.blogspot.com/2015/07/peytons-1st-birthday-sail-bration.html
Invitations: http://manicmamamiles.blogspot.com/2016/02/peytons-1st-sailabration-invitations.html
Food: http://manicmamamiles.blogspot.com/2015/10/peytons-sailabration-food.html
Food Decorations: http://manicmamamiles.blogspot.com/2015/11/peytons-1st-sailabration-food.html
Decorations: http://manicmamamiles.blogspot.com/2015/11/peytons-1st-sailabration-decorations.html

Wednesday, November 11, 2015

Peyton's 1st "Sailabration" Decorations

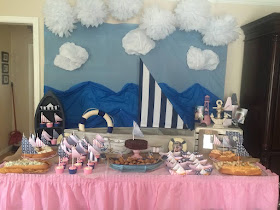
For Peyton's 1st birthday "Sailabration", I started with the backdrop.  I took the largest boxes I could find (two men's suit boxes) & broke them down & taped them all together.  
 I then had some $1 plastic tablecloths from the Dollar Tree.  I took two of them & taped them to the cardboard piece.
 I used two because you could see still through the first one.
 I had also bought some tissue paper from the Dollar Tree & used it to make waves.  I taped it around the back & then used flat push pins to attach it to the cardboard.  I also took white tissue paper & bunched them up & hot glued it to the backboard for clouds.  I hung white poofs from Party City as additional clouds.
 In addition to the backboard, I used two bookshelves from baby Peyton's nursery.  I kept one up & laid the other down as my "boat" centerpiece. 
 I wanted the main colors to be navy & pink, so I used a pink tablecloth & tableskirt.
 Recognize the sail?  Yep, it's leftover fabric from my no-sew curtains from Peyton's nursery.  I took three pieces of wooden dowels & hot glued them together.  I then just wrapped the fabric around the backsides of the dowels & hot glued them to make the sail.  It was super easy.  I wasn't sure how to keep the sail upright, but luckily, the bottom part of the sail reached across to the back of the boat & could rest on it.  The main part of the sail, I just used clear shipping tape to tape it to the boat so that it would sit upright.  

 In the boat, I set the life preserver that I made a long time ago for an "Ahoy! It's a Boy!" baby shower.  In front, I set the oar & picture frames from Peyton's nursery.
I also used on the crates that I use for most any party.  I set it upside down & put other decor from Peyton's nursery on it, as well as pictures of baby Peyton.
 I bought a wooden letter P from Hobby Lobby & just traced it on scrapbook paper.  Then I cut it out & used spray adhesive to bond it.  
 This is a before picture of the boat centerpiece.  I found this at a yard sale for $20!  Probably my best find ever.  I painted it using the same paint as Peyton's dresser.  It looks so good in Peyton's nursery & is perfect for storing books.  It was also perfect as a centerpiece for Peyton's "Sailabration"!


Main Party Page: http://manicmamamiles.blogspot.com/2015/07/peytons-1st-birthday-sail-bration.html
Invitations: http://manicmamamiles.blogspot.com/2016/02/peytons-1st-sailabration-invitations.html
Food: http://manicmamamiles.blogspot.com/2015/10/peytons-sailabration-food.html
Food Decorations: http://manicmamamiles.blogspot.com/2015/11/peytons-1st-sailabration-food.html
Decorations: http://manicmamamiles.blogspot.com/2015/11/peytons-1st-sailabration-decorations.html

Friday, October 23, 2015

Peyton's "Sailabration" Food

Well over 3 months later, I'm finally writing about the food from sweet Peyton's 1st birthday "Sailabration".  It's been a whirlwind 3 months.  Addy started school, dance & Fall soccer.  Football season started.  And we had a 1000 year flood which sadly damaged a lot of our beloved city, especially my surrounding area.  Thankfully, all of our loved ones & our home were safe, but a lot of people lost so much.  It was definitely a heartbreaking time.  Amongst all of the chaos, our sassy Addy turned 4 & we had her birthday party.  So we have had our hands full.  Hopefully before 3 months from now, I can get to Addy's birthday party (hint, it was a Frozen Movie Theater theme), but for now, I'm going to try & finish up our sweet baby girl's first birthday posts.  : )

So for Peyton's "Sailabration", the food was pretty simple.  We had sandwiches, sausage balls, dips, goldfish, cake & cupcakes.
For the sandwiches, I took bollo rolls I found at Sams Club & split them down the middle & filled them with chicken salad & pimento cheese. 

 I made little paper boats that I will talk more about on the Decorations post.  I filled the boats with goldfish for the kids.
 I also took large french loafs & carved out the middle.  I filled these with spinach/artichoke dip & buffalo chicken dip.  I served them with crackers & chunks of the bread I had scooped out of the middle.

 For the homemade okay made from a box mix cupcakes, I just iced 12 strawberry cupcakes with pink cream cheese icing & the other 12 with white icing & alternated cupcake wrappers & sails.
 
 I made "buoy balls", which are the super easy Bisquick, sausage, & cheddar balls.
I threw them in a wooden boat I found at Hobby Lobby that I cleaned up & now holds some little books in Peyton's room.   

For the cake, this was probably the simplest cake I have ever made, which is good because you know I'm not great at it.  I baked a cake in a loaf pan.  
  See cake.  
 I cut the front into the shape of a boat.
I iced cake, but a sail on it & called it a boat.  ; )  See how simple that was!  And it was delicious.  

So that was all of our delicious, yet super simple, nautical party food.  Hopefully one day soon I will be back to talk about the super simple decorations that I did for this party.  Happy weekend everyone!


Main Party Page: http://manicmamamiles.blogspot.com/2015/07/peytons-1st-birthday-sail-bration.html
Invitations: http://manicmamamiles.blogspot.com/2016/02/peytons-1st-sailabration-invitations.html
Food: http://manicmamamiles.blogspot.com/2015/10/peytons-sailabration-food.html
Food Decorations: http://manicmamamiles.blogspot.com/2015/11/peytons-1st-sailabration-food.html
Decorations: http://manicmamamiles.blogspot.com/2015/11/peytons-1st-sailabration-decorations.html

Tuesday, July 21, 2015

Peyton's 1st Birthday "Sail-a-bration!"

So how in the world did my sweet baby just turn 1?  I swear I was pregnant with her 5 minutes ago!  But all you parents know, time flies by so quickly.  For Peyton's first birthday, I wanted to do a nautical themed party like her nursery...a "sail-a-bration" if you will...I know, so corny, I can't help myself. : )

The great thing about doing the same thing as the nursery was that I could just use decorations from Peyton's room to decorate the table.  I saved so much money by using things I already had.  Remember this little bookcase from her room?

Yep, I used it to hold cupcakes.  See the life preserver that I made years ago for the Ahoy! It's a Boy! baby shower?  Yep, I tossed it in the boat.  The boat was the main thing on the table.  Stay tuned for the story of the boat soon.  : )  It looks like it's just a regular boat while it is laying down, but it is actually an awesome bookshelf that I consider one of my greatest finds. 
  
On the other side of the table, I used a crate that I'm forever using at parties & put some of Peyton's accessories from her room on top.  Remember the DIY buoys I made?  Yeah, they made another appearance. : )  I also used anchors, picture frames, etc. from her room.  In fact, the only things that I made for this party were the backdrop, sail & food decorations (well and some of the food if you count boxed cupcakes & moving things from containers, haha). 
This party was so much fun & really pretty simple to execute.  A little time consuming with cutting out lots of paper, but that was fine.  I can cut a lot of paper once the kids go to bed & I'm mindlessly watching The Bachelorette.  No judgment, it's a nasty habit, but I'm so obsessed.  Stay tuned for more posts about the backdrop, the sail, the food & the food decorations.  Anyway, I hope that you are all doing great & having some amazing "sail-a-brations" of your own!

See more about this party...
Main Party Page: http://manicmamamiles.blogspot.com/2015/07/peytons-1st-birthday-sail-bration.html
Invitations: http://manicmamamiles.blogspot.com/2016/02/peytons-1st-sailabration-invitations.html
Food: http://manicmamamiles.blogspot.com/2015/10/peytons-sailabration-food.html
Food Decorations: http://manicmamamiles.blogspot.com/2015/11/peytons-1st-sailabration-food.html
Decorations: http://manicmamamiles.blogspot.com/2015/11/peytons-1st-sailabration-decorations.html

Saturday, May 30, 2015

Graduation Cupcakes

Oh my goodness, May has been insane.  Between work, traveling for work, dance recitals, soccer games, and even a little vacation time, it has been a madhouse.  A wonderful madhouse, but still pretty crazy.  So I have been a little MIA.  But I am back...for the weekend before I have to go to a conference.  Haha.  I know all of you have probably had just as crazy of Mays.  And with May comes graduations.  My little ones are too small for graduations, but each year my law clerks graduate from law school & move on into the real world.  One of my clerks turned into a dear friend of mine and when she left, I made her some cute graduation cupcakes.  These are so easy & super cute.  
Here is what you need: 
Cupcake mix
Icing
24 Reese's Peanut Butter Cups
Chocolate Squares
Mini M&Ms
Twizzlers
I started with cupcakes.  These look chocolate, but are actually the same Guinness cupcakes that I had made for my grandfather's birthday at his 90th Vintage Beer-themed Birthday party.  These are delicious, but regular chocolate would do if that's what you or your graduate would rather have.  It's also a lot less time consuming when you have graduation parties to get to. : ) 
Then you just frost up the cupcakes.  I did use chocolate icing.  The rich fudge kind.  Yummo.
Now the rest is pretty much candy.  Delicious, right?  Take Reese's peanut butter cups & turn them upside down onto of the iced cupcakes.  Take some of the icing & put it onto of the Reese's cup to place a square of chocolate.  Honestly, I should have just bought already squared chocolate because this was the hardest part...breaking the chocolate into even squares.  Isn't that crazy?  But what are you to do when you break a lot of uneven chocolate?  Eat it of course. ; ) 
Anyway, use some more icing & put a mini M&M on top of the chocolate square.  I had then cut up some Twizzlers to make the tassle.  Use some icing to attach it as well.  And there you have graduation cupcakes.  These were a big hit & pretty delicious.  Happy end of May everyone!  I hope your summers are starting out wonderfully!

Wednesday, May 13, 2015

Southern Ham Delights

For Peyton's baptism, one of the things I served was Southern Ham Delights.  If you have not made this, please go make them now.  You will not regret it.  Here is a list of things you will need:
* Sweet Hawaiian rolls
* Honey Baked Ham shaved (appx 12 slices)
* Sliced Provolone Cheese (appx 6 slices or enough to cover the pack of rolls)
* Honey Mustard (I love Ken's Steakhouse spread in the condiment section over the dressing kind)
* 2 tsp Worcestershire sauce
* Poppy Seeds 
* 1 stick of Butter

Preheat your oven to 350.  Then start by slicing all of the Hawaiian rolls in half length-wise to keep all the tops together & all the bottoms together.  Place the bottom rolls into a baking pan & cover with Honey Mustard. 
Then add in your ham.  I used Honey Baked ham, but you can use any of your favorites, as long as it's delicious. ; )
A lot of recipes use Swiss for Ham Delights.  I'm not really that big on Swiss, so I used provolone instead.  You can use Swiss, or even Havarti or Monterey Jack if you want to give it a little kick.
Cover the cheese with Honey Mustard.  Are you sensing a trend here?  : )
Take your stick of butter & melt it in the microwave & then pour in your Worcestershire sauce & shake in the amount of poppy seeds that you are into.  Mix it all together.
Put the top half of the rolls back on & cover the top with the butter mixture.
So delicious.
Bake for 20 minutes until the tops are browned.  Then, just enjoy the deliciousness.
Main Baptism Party Post
Pinwheel Cross Post
Baptism Banner Post
Southern Ham Delights